
Okay.... don't worry! This whole homeschooling thing hasn't really gone to my head!
But I do have a couple of things that I wanted to 'teach' you all today....
Firstly, I so appreciate the comments that readers leave for me and I try to answer each and every one of those comments, especially when I am asked a question.
But sometimes, I can't reply to a comment/question because I receive a "no-reply-comment"..... which means that the reader has their blogger profile set so that I can't see their email address. I certainly respect a reader's privacy but I bet many readers are not even aware that they have their profile set like this.
So....if you are so inclined, let me 'teach' you how to change that setting....
First, you need to locate your Blogger Dashboard.....
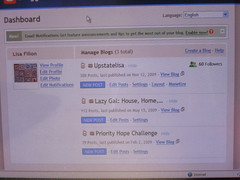
Mine looks like this....


and at the bottom of that page, click on save settings!
So now, when you ask me a question, I can answer you personally!!!!
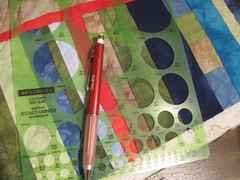
And talking about questions.... I had several questions on how I made my quilted circles on my waverunner quilt and so now I will 'teach' you how.
Class...
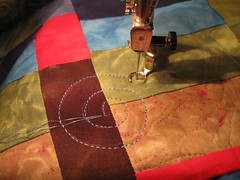
....you will need some sort of marking pencil or pen that fades or erases and some kind of circle stencil with circles of various sizes (I picked my stencil up at Staples)...
....you will need some sort of marking pencil or pen that fades or erases and some kind of circle stencil with circles of various sizes (I picked my stencil up at Staples)...
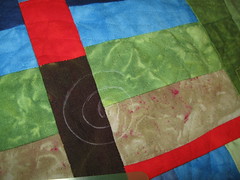 Not sure that makes sense but there is a photo to help (okay... so I am not the best teacher you have ever had!!!)
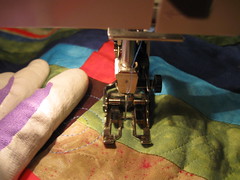
I, then, set up my machine for free motion quilting with my quilting/darning foot, feed dogs down, adjust my tension and pull up the bobbin thread to the top.
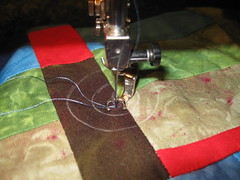
After I do a few stitches in place to start, I begin to roughly follow the spiral that I sketched out...
like so.....
It is by no means rocket science (I don't teach that!)....
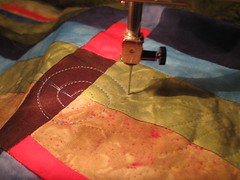
I spiral around several rounds before...
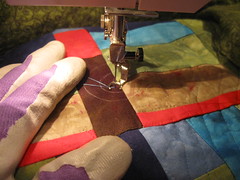
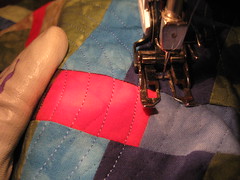
I stop my needle down (in the fabric), change my quilting foot to my walking foot, engage my feed dogs again, make sure my tension is okay.....
I then begin moving my walking foot around in circles, using the side of the foot against the previous line (or circle, as the case may be!) of stitching...
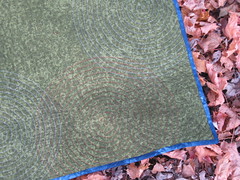

Okay.... Class dismissed!!!!

Oh...I understand and have no questions, but.....my free-motion quilting isn't so great (stitches vary a lot in length), so the inner part of my circles would have wonky-looking stitches and then the part where I'd use the walking foot would look nice and even. I guess there is no way to avoid that, though....other than PRACTICE getting better with free-motion??? (UGH...I thought that was what you were going to say, dear teacher!!!)
ReplyDeleteLove your teaching style!
ReplyDeleteThank you so much! I just got a darning foot for my b-day (he lvoes me!) but I haven't started playing with it yet. This will be my starting point I think! [I was worried for a minute you'd try to teach me Saxon Math: I didn't want to ravage a village and have to use it to count my army - or the enemies!]
ReplyDeleteI aspire to be half as smart and half as talented as you are, dear teacher.
ReplyDeleteI'm just getting started with free motion quilting. Can you explain how to pull the bobbin thread to the top?
ReplyDeleteLove your circles!
Thanks!
That was a great explanation on how to do those circles. I just may have to try that! Thanks.
ReplyDeleteGreat idea for the circles!
ReplyDeleteLike you, I always feel so bad when I cannot reply to comments.
You are a star teacher! I'm off to do some homework, now...
ReplyDelete; )
Excellent instructions - I've been wondering how you achieved such perfect circles! Here is another burning question - do you knot the threads on top of your quilts or on the bottom? I see where you pull the initial bobbin thread to the top when you begin the circles.
ReplyDeleteThanks for sharing, Lisa, and have a great weekend!
You are so clever! Thank you for those fabulous instructions. I would never have thought that you did it that way.
ReplyDeletethanks for all the helpful hints
ReplyDeleteOhhhh, I like the instructions on blogger! Half my comments are set to No Reply, fustrating! Might have to direct them to your tut. :)
ReplyDeleteSwirls look great Lisa!!
Thank you teacher - you make it look so easy. If it is so easy, why am I so afraid of quilting my own quilts???
ReplyDeleteI guess one day I'll just do it!
I love both the tutorials! :-)
ReplyDeleteAh ha!! Success (I think). Thank you for the education in Blog Studies. I know I have friends who will appreciate my new found knowledge! Thanks again!
ReplyDelete